No Fail Recipes

Best Ever

Quick Pickles Tips & Tricks

Comments Off on Quick Pickles Tips & Tricks

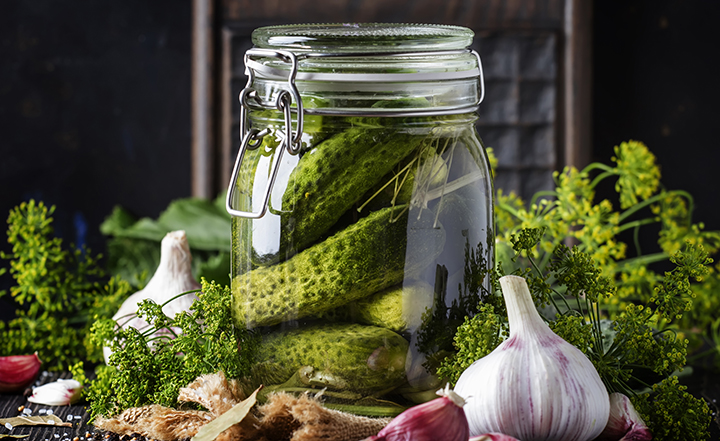
Quick Pickles vs. Canned Pickles

Quick pickles are not heated and are stored in the refrigerator whereas canned pickles must be heated to preserve them. These pickles will have a shelf life in the refrigerator of between 1-2 months whereas canned pickles can be stored for as long as a year in a dark pantry. They will be crisper, brighter and better tasting.

Quick Refrigerator Pickle Process

Cucumber selection: The differences between a standard cucumber and the pickling cucumbers the difference are several. Pickling varieties have thinner skins, have smaller seeds and are extremely crisp. Pickling cucumbers are also typically smaller in size. Varieties include:

  • Kirby (most common pickle cucumber)
  • Boston Pickling Cucumber
  • National Pickling Cucumber
  • Bush Pickle
  • County Fair 83
  • Regal
  • Saladin
  • Calypso
  • Little Leaf
  • Carolina

Prepare jars: Use glass canning jars that have been cleaned and have tight fitting lids.  You are not canning pickles but these work and store well.

Prepare cucumbers: Use the freshest pickles.  Wash cucumbers well and remove a small part of the blossom end to reduce spoilage. Pickles can be cut into halfs, spears, or rounds. Fill jars with the cucumbers.

Make your brine: Combine water, salt, vinegar and any aromatics. Sugar is optional and will help offset the pucker punch of the vinegar. Add aromatics which often includes mustard seeds, allspice berries, black peppercorns, coriander seeds, minced garlic, red pepper, cinnamon, cloves, ginger and chili pepper for a little heat. Heat this mixture to dissolve the salt and optional sugar. Let cool to room temperature. If you don’t cool the brine, you will partially cook the cucumber and they will become less crisp.

Add the brine: Pour in enough brine liquid to completely cover the cucumbers. Once filled seal the jars.

Refrigerate: Put pickle jars into the refrigerator. Don’t touch for at least five days to let the brine do its magic. The pickles will keep in the refrigerators 1 to 2 months. Since you didn’t go through a canning process, quick pickles must be stored in a properly chilled refrigerator. Use a perrmanent market to write on the lid thedate you made this pickles.

Variation of Quick Refrigerator Pickles

Spicy Pickles: Turn up or turn down the heat to suite your tastes. Add more or less red pepper flakes. I made these a mild heat level to accommodate most palates, but if you want more of a kick, feel free to add as much red pepper flakes as you want. Sliced jalapens or other similar chiles can also be added.

Sweet Pickles: If you prefer sweeter pickles, increase the sugar.

Other Vegetables: You can pickle onions, green beans, carrots, cauliflower and many other vegetables. Some vegetable may be parboiled ahead like cauliflower and green beans.

6 Techniques to Perfecting French Toast

Comments Off on 6 Techniques to Perfecting French Toast

#1 Thickness Counts in French Toast

Your bread need heft and strength. This is necessary to both soak up all the liquid ingredients but also so each French toast slice won’t disintegrate during preparation. Choose from between ½-inch to as much as 1-inch thick slices of bread.

#2 Choose Your Bread Wisely

A dense-crumbed white sandwich bread is classic and run-of-the-mill. However, if you are going to indulge on French toast, go for the extra dose of richness, of an egg challah or brioche. It is best to use day-old, dried out bread, which is better to soak up all the liquids. If you bread is fresh, you can dry it out in the oven at 200 degrees F for about 15 minutes.

#3 Just the Right Amount of Milk and Eggs

Milk and eggs are the key ingredients to create the creamy custard base that gives French toasts it tender richness. The basic rule of thumb is 1 egg and ¼ cup of milk per 2-slice serving if you are using ½-inch thick bread. Double that for 1-inch thick bread. And don’t scrimp on the fat, use whole milk or even half-and-half for the added richness. An alternative is also to use just the egg yolks but then double the number of eggs to get the right amount of liquid.

#4 Add More Flavor Dimensions

Eggs and Milk are the only essentials required for the custardy base for the French Toast. But to give it that distinctive flare, vanilla extract, a tablespoon of sugar and/or a pinch of cinnamon gives a standard French toast a complete upgrade. Granulated sugar will provide some caramelization but brown-sugar will take that up a notch or too. Replacing the vanilla with rum, Grand Marnier, or a splash of bourbon will deliver another totally new dimension.

#5 Use a Combo of Butter and Oil

Butter has a tendency to burn too quickly, which will completely run your French toast. But butter is an essential part of the flavor profile you are trying to achieve. The solution is to swap out one-half the butter with plain vegetable oil such as canola oil. Using this combination will allow you to get a nice crisp exterior an a tender custard interior.

#6 Selecting the Add-ons for your French Toast

Choose wisely: powdered sugar, a great maple syrup, or maybe even caramelized bananas. Powdered sugar is the classic and a perfect complement. The other extreme, go for a bananas-flambé – not only impressive to view, but amazing to eat. Just be prepared to eat nothing else the rest of the day. Maple syrup is another classic. While Grade A the classic, Grade B is much darker and a lot more robust. Try a little of both and see what you prefer but either way will be delicious.

Best Dessert Wine Pairings

Comments Off on Best Dessert Wine Pairings

Dessert wines are often over-looked yet can truly enhance your epicurean experience. Whether you want to buy your wine online, go into a store, or visit a winery – without the knowledge on good wines to pair with your desserts, you’ll come away with a wine that won’t heighten your dining experience as it should. A few simple guidelines should make it a fun exercise! The golden rule for pairing wine with with desserts: The wine should be sweeter than the dessert. Then, match the flavor intensity of the dessert with the flavor intensity of the wine.

Firstly, back to the golden rule for pairing wine with desserts – the wine should be sweeter than the dessert. Secondly, match the flavor profile of the dessert with the flavor profile of the wine. Here are more specific tips:

  • PX (Pedro Ximénez) – this is a luscious Spanish dessert sherry wine made from dried grapes. This wine is so sweet with strong flavors of raisins and molasses, it can simply be poured over vanilla ice cream. Pair with bread pudding, white or dark chocolate desserts, and orange flavored desserts.
  • Sauternes – Sauternes are characterized by a balance of sweetness with the zest of some acidity. Common flavor notes include apricots, honey, peaches but slightly nutty. Try a Sauterne with Creme Brûlée, apple tart tatin, peach pie, or an English Trifle.
  • Ice Wine – Or, Icewine, are refreshingly sweet with high acidity. They typically have a medium to full body with a long lingering finish. The nose is usually reminiscent of pear, peach, dried apricot, citrus,honey, figs, caramel, and green apple. Riesling style Ice Wines, which are quite common, can be paired with key lime pie, lemon tarts, fruit tarts, or fruit-based creme brûlée. Or, drink all by itself.
  • Tawny Port – A Tawny Port with it slightly sweet yet nutty, caramel flavors pairs well with fruit cakes, mince pies, and eggy pastries including custards and flans.
  • Ruby Port – Try a Ruby Port, which has fruity notes and easy tannins pairs well with a decadent but not too sweet chocolate dessert. It goes with a chocolate cake with a raspberry sauce, or a dark chocolate fondue, or a simple chocolate brownie.
  • Late Harvest Zinfandel – Find dried cherry and chocolate notes in Late Harvest Zinfandels. These dessert wines go well with of course chocolate and chocolate desserts. Also try it with cheesecakes, cherry pies, and carrot cakes.

One last rule of thumb – leave room for dessert!!!

Best Coffee Brewing Tips

1 Comment

Best Coffee Brewing Tips

For perfect coffee, here are tips to ensure ideal extraction and flavor.

1. USE FILTERED WATER

A cup of coffee is about 98 percent water, so if your tap water tastes bad or has strong mineral flavors, your coffee will too. We found that the test kitchen’s tap water masked some of the coffee’s complexity, compared to coffee made with filtered water. Don’t bother buying bottled water-just use a filtration pitcher. For the best water quality possible, installing one of the water softeners offered at https://waterfilterway.com/best-water-softener-reviews/ would be wise. Continue reading

Perfect Pizza Preparation

Comments Off on Perfect Pizza Preparation

Pizza Margarita

Pizza is universally loved, whether a deep-dish Chicago-style, Sicilian style or a thin crust Neapolitan. A pizza offer an infinite array of tastes, not only because of the dough but it offers a canvas for a wide range of sauces and toppings. While take-out is great, making a really great pizza at home is even better but challenging.

Our goal, to make the best homemade version ever and it all starts with the crust.

Continue reading

Making the Best Salmon Ever

Comments Off on Making the Best Salmon Ever

Best Salmon Ever

Even for the most die-hard of meat-eaters the salmon packs a fatty, flavorful punch that makes it a truly viable choice for a bite with boom. Popular salmon species include Chinook salmon, Sockeye Salmon and Atlantic salmon.

Salmon is one of the more succulent fishes you can enjoy; it even has various cuts like steak. In fact you can actually purchase salmon steak. Additionally filet of salmon and whole salmon are also popular for cooking and consumption.

Mega my Omega

Yep, if you want omega you got all kinds of omega in salmon. The fish is an Omega-3 powerhouse, one of the best food sources available to us. Omega-3 fats are the good kind of fat that we need but don`t actually produce in the body. Studies have indicated that Omega-3 is particularly beneficial for mental health by way of encouraging the production of dopamine and serotonin.

In fact the human brain and eyes are composed of a large amount of Omega-3.

The Best Grilled Salmon Ever

So what`s the best way to get the best grilled salmon ever. Well we’re going to share that with you right now. First we’ll start off with grilling a cut of salmon and then we’ll move on to cooking the whole darn caboodle.

Step 1

For the good of the environment and to show kindness to your body, make sure you purchase wild salmon. Farming salmon is an unsustainable practice and pools of farmed salmon can lead to disease in the fish population which of course is not something you want to partake in consuming.

Step 2

When buying salmon cuts, it is best to stick to salmon with the skin on. Leaving the skin on the salmon helps in preventing it from sticking to your grill and can also ensure that the whole thing doesn`t fall apart.

Step 3

Your optimum heat level for your grill is medium-high, this keeps it high enough to prevent sticking but also ensures you get a slower heat so you can a nice, evenly grilled fish. For a piece of salmon that is 1″ thick you’ll need approximately 10 mins. of cooking time with a flip halfway through.

Step 4

The salmon is a smart piece of fish and that`s why you don`t need to pick and prod at it as it is cooking. Just let it cook and after 5 mins. you can gently give it a little push to see if it comes off the grill on its own. A fish that is ready to be turned over will easily slide off the grill.

The Whole Fish

Step 1

Select your salmon and have your butcher gut and clean it for you (or you can do it yourself, but it will get messy if you’re a newbie).

Step 2

Lightly oil your grill grates and preheat your grill at medium high.

Step 3

Prepare your fish by stuffing it with herbs and butter or lemon and then rub the whole fish with good quality oil like coconut or extra virgin olive oil.

Step 4

Make three or four diagonal cuts into the skin of your fish so that it has some give as it cooks.

Step 5

Place your whole fish on the grill and cook until 10 mins. are up, then nudge the fish slightly to see if it comes up off the grill on its own. If it comes off the grill easily then flip it over and cook for another 10 mins. You can gently touch the fish with your finger to see if it is firm, if it is all firm this means it is cooked, but if it’s slightly jiggly then it needs more cooking.

How to Make the Best Ice Cream Ever

Comments Off on How to Make the Best Ice Cream Ever

Best Ice Cream Ever

I think that when it comes to ice cream we all think the same way, but no one put it more eloquently than Ginger Rogers. She said, “My love for ice cream emerged at an early age – and has never left!” What could be more delightful than eating an ice cream? I think it is one’s ability to make the best ice cream ever and that too at their home. Speaking of which, my friend recently got the best refrigerator under 15000 to make all the ice cream he can manage.

However, making ice cream at home is not everyone’s cup of tea. First of all, it requires all the necessary equipment, so you’ll probably have to think about buying an ice cream maker; secondly and most importantly it demands you to be one hell of an ice cream chef to make the best ice cream at home. Yet, with these easy tips, we assure that you can make the best ice cream ever.

  1. Rejuvenate your love for vanilla – A survey by the International Ice Cream Association reveals that the most popular ice cream favor in the USA is vanilla. It is the most popular ice cream flavor in the world too. So in this article, you will learn how to make the best vanilla ice cream at home, be it by using one of the best ice cream maker options or other means of churning, and here is the first tip; fall in love with vanilla again.
  2. Ingredients – You need to get all the required ingredients to make the best vanilla ice cream ever. You need 1-1/4 full fat milk. ½ cup golden caster sugar, 1 vanilla pod, 3 large free-range egg yolks and ice.
  3. Get ready to make the best ice cream – The day before you want to impress your friends and family with your master cookery, get the canister from your machine and put it into the freezer to adjust the temperature.
  4. Vanilla day – The next day wake up with the will and wish to make the best vanilla ice cream ever. You need to mix the milk and cream into a medium sized pan, and then mix half the sugar. The vanilla pod you have is the fruit of vanilla plant and you will use it to add the arousing vanilla flavor to your ice cream. Get a small kitchen knife and slice the vanilla pod vertically (I used my best japanese knife). Then extract as many of the black seeds as possible and put those black seeds into the cream mixture. After you have done this, cut the pod into small bits and drop those bits into the cream mixture.
  5. Heat up the temptation – Now that you are done with mixing milk with cream and adding vanilla pod to the mixture, it is the time to heat up the temptation to make the best ice cream ever. You should remember that heating the cream and milk is the most important part and you can either ruin it or do masterfully. Let the mixture boil on a mild heat. Stir the mixture from time to time and take care of it until it almost boils. Then you need to take the pan off of the heat for 30 minutes.
  6. Eggs are not to be taken for granted – Take only the egg yolks into a bowl, put some sugar and beat it with egg beater until the mixture thickens. Now is the time to get some cream mixture and put it into the egg yolks and stir it until the yolks are slacken. Then you need to reheat the cream until it is boiled and then mix the egg yolks mixture into the cream.
  7. Low heat time – Now you need to keep low heat and keep stirring until you see that the mixture in your pan is thickening. You need to make sure that there are no bubbles on the surface – if there are any, it is the sign that you should take the pan off the heat.
  8. Make it or ruin it – Now comes the hardest part. You need to put all the custard into a small bowl and place that bowl into a bigger bowl one third full of cold water. Give it some time and keep stirring to avoid the formation of any skin on the surface. Then put the small bowl in a freezer for 4 to 5 hours.
  9. Ice cream machine time – Now you need to switch on your ice cream machine, get the vanilla pod pieces out of the custard and slowly pour the custard into the machine. Let it churn for about 20 minutes and see if the cream is too soft to eat. Put the cream into a plastic bowl and put it in a freezer for around 4 hours. After 4 hours, it is ready to serve. Congratulations! You have made the best vanilla ice cream ever.

Here are some general tips to take things to the master chef level.

Add some sweetness – People who make ice cream at home make a common mistake. They use simple table sugar in the ice cream and they expect their ice cream’s texture, body and creaminess to be just as good as any master chef’s ice cream. However, it is a mistake. If you do not want to make any but the best ice cream ever, we suggest you to use alternate sugars like invert sugar or glucose syrup. The alternate sugar like glucose sugar will give a tremendous texture and creaminess to your ice cream.

Make it scoop worthy – At restaurants and ice cream parlors, they keep the temperature of their freezers from 0 to 10 Fahrenheit in order to keep the ice cream scoopable. If you want to give your guests a pleasant surprise and you want them to be in awe of your homemade ice cream, make sure that it is neither melt nor too cold.

Use some stabilizers – If you want to make the master chef level ice cream at home, you should remember that making an ice cream is easy but keeping it in good form is very difficult. This miracle can be made possible by using some good stabilizers like gelatin and milk powder. From texture to chewiness, there is a lot that stabilizers can do for your ice cream.

If you take care of all these steps carefully, perhaps not at the first attempt but at the second or third attempt, you will make a flawless vanilla ice cream that will make any good chef envious of you. The beauty of vanilla ice cream is its creaminess and texture, not only the taste. Take care of the special tips in the end and you will make an ice cream that will not only taste good, but also feel and look as good as any master chef’s ice cream. So, now that you know how to make the best ice cream in the world, go make it and make your family scream for ice cream every Sunday!

How to Make the Best Pasta Ever

Comments Off on How to Make the Best Pasta Ever

Best Pasta Recipe Ever

A twirl of the fork, a scooping of spaghetti sauce and a little sip of wine make for the best pasta ever, bordering on divine.

Pasta is comfort food, good food, hearty stick-to-your ribs, anytime-is-a-good-time food. It’s hard to believe that this dish that is so ubiquitous in North America has its beginnings in the old World. In order to learn how to make the best pasta ever you`re going to need to know a little bit about where it came from.

Pasta came to America via the kitchens of mamas and grandmamas that immigrated to the good old United States from Italy. Pasta enjoyed its heyday in the later part of the 1900s and spread across North America and with it spread the secrets to a great pasta every time.

Moving to present day, pasta has been incorporated into the weekly dining routine of numerous households. In fact, head to a grocery store in almost any corner of North America and you’ll find at least part of an aisle dedicated to the various shapes of pasta. And you’ll find many a pasta recipe on blogs like http://www.st-ambrose.com/ too – it really is one of the most beloved foods out there.

So what is the trick to whipping up the perfect pasta? Well let’s tell you all about it. Here we go.

Step 1

Make sure you’ve got a nice large pot for boiling water. Your pasta should be able to easily float around without the noodles getting stuck to one another. An 8 quart pasta pot is ideal. You should fill the pot approximately 75 percent of the way up with water.

Step 2

Once you’ve selected the ideal pot, fill it up with cold water. Filling it up with cold water will allow it to slowly reach the boiling temperature. Once it hits boiling, you’lll know that all of the bad gunk is being eliminated. and that will then give you time to spill ou the excess water.

Step 3

It is important that you salt your water so that your pasta will have some flavor.

Step 4

Add some extra virgin olive oil to your pot to ensure your pasta doesn’t stick together. The addition of the oil will also help the water from boiling up and over the pot.

Step 5

Bring your pasta up to a rolling boil before tossing the pasta in. This will help the pasta cook evenly. Once the water is boiling, toss your pasta in and make sure to give it a stir so you don’t have any pasta clumping together.

Step 6

Now comes the patient part. You must wait without fiddling with the cooking pasta, just let it do its thing. You should cook it for several minutes less than the package instructions. Before completely removing the pasta from the water, give your pasta the chewability test. If you like the consistency take the pot of water off the stove and drain your pasta.

Step 7

You should have already cooked up a sauce, so the best thing you can do right now is plate your pasta. You will need to top the best pasta ever with your delicious basil garlic pasta sauce and enjoy. There is nothing worse than a plate full of cold, sticky pasta after you’ve spent hours on the sauce. So enjoy both the sauce and pasta together when they’re at their flavor optimal best.

Tips for Making the Best Cake Ever

Comments Off on Tips for Making the Best Cake Ever

most perfect cake everCake is a celebratory dessert isn’t it? Cakes almost always enter the scene when the crowd is mid-party. There is something about cake that feels so indulgent and special. Most of us can remember our favorite cakes we’ve ever had. Usually those memories are so strong because they took place around a special or important event, but sometimes it’s because the cake itself was so moist, so decadent, and so perfect that it stayed with us as the infamous never beatable cake.

Home cooks make the mistake of relying on boxed cake mixes when they feel like making a cake in their own kitchen. These mixes never come close to living up to the dream cakes of our memories. And of course they can’t; those mixes are full of unnecessary additives that help them stay fresh on the shelf. They also require tons of oil, and not a lot of creativity. Anyone can make great, from-scratch cake at home. Pay heed to the following tips, and your home-cooked cake will eventually be one of those few, great, unforgettable cakes. Obviously, we are not all whizzes in the kitchen and do need some assistance when it comes to baked goods, that is why some amateur bakers will order cupcakes online in the UK or in the US depending on their location, so they can have perfectly made sweet treats whenever they can.

Follow a Few Good Recipes

If you are looking to create your custom from-scratch cake, the first thing you need to have is proper equipment. From setting trays, oven, food grinder (like the ones you can see at https://serp.co/best/stand-mixer-food-grinder/), proper spatulas, etc., you need to have everything arranged well in advance before you begin making the cake. Next, all you have to do is follow a few really well-written and tested recipes. Source your recipes from large reputable sources such as America’s Test Kitchen, anything by Barefoot Contessa, or a large magazine like Bon Appetit. The kitchens and food professionals who wrote these recipes put the ratios and ingredients through the ringer, so you know that the end-result will be a great cake. If you’re really serious about baking, you could attend some Start a Bakery classes to improve your skills.

When you’re following these recipes pay close attention to every detail. Recipes, specifically baking recipes are precise for a reason. Every step, the order of the steps, and the amount of ingredients used is chosen for a for specific reason. After following a few cake recipes you will begin to see patterns: cream sugar and butter first, add eggs, whisk dry ingredients, add dry to wet slowly. These patterns that you notice will begin to teach you something important: how cake works. This is the first step to making wonderful cake.

Stay Organized & Clean

Whether you’re cooking or baking, having a clean and organized work environment is essential. Keeping your area neat means there is less of a chance of you making a mistake. Baking is a delicate act; you do not want to be hurried or flustered by a messy environment. There is a French term for cooking & baking in a clean, organized environment: mise en place!

Accuracy is Important

One of the things that make baking so different than cooking is the importance of accuracy. When you’re baking your cake do not “guess” on the ingredient amounts. Be very accurate. If you are a beginner, you might what to consider taking online baking courses to understand the basics. You can also buy a kitchen scale. They are not expensive, and they will make your baking process much simpler.

Think About Temperature

If your recipes call for cold eggs and room temperature butter, make sure that is what you have. Baking a cake is all about chemistry and how those ingredients reach to one another. Temperature plays an important role in that interaction. You might consider buying a thermometer for your oven, as often the built-in temperature gauge on standard ovens is not very accurate.

When Baking, Don’t Peek!

It can be really tempting to open the oven to peek in on your masterpiece, but try not to. The rush of cool air into the oven can cause your cake to fall, which would be a huge shame. It’s tough, but just wait until it’s done to take a look.

Do Not Frost Until Cool

Baking a cake is not a “last minute dessert”. If you need to have a totally finished cake within a couple of hours, you might as well just go buy one from a bakery. After the cake is done cooking it needs to be completely cool before you frost it. What happens if you don’t wait? Well your frosting will melt into pure liquid, which will be not only sad but totally unappetizing.

Tips for Making the Best Apple Pie Ever

Comments Off on Tips for Making the Best Apple Pie Ever

Best Ever Apple Pie

The humble apple has all sorts of uses from sweet to savory. It can be cooked, raw, stewed, used as an accompaninet or bitten right into for a dose of raw goodness. addition to being a good addition to lunch boxes, apples are good ingredients found in cobblers, muffins, salads, and apple pies.

You might have heard people saying, “Easy as apple pie” many times, but do you know how to really make an apple pie? Perhaps, you have been wondering how to do that for a long time. If so, we are going to explain step by step how to make delicious apple pie like a pro and not have a nervous breakdown in the process. Yes, you can do it. It is easy!

Things to bear in mind to make the best apple pie

The Apple is the Main Thing

When making apple pie, what you need the most is apple itself. But, you need the right types of apples. If you are living in an area with apple groves, then selecting a combination of tart and sweet apples will be great. But, if you are not living anywhere near an apple grove, it is best to get Granny Smith apples for your pie. It is a good one to get started. The combination of the tartness and the sweetness of the sugar/cinnamon mixture make an amazing taste. You may also consider another combination that works great which is McIntosh and Cortland apples. However, they must be fresh

Pre-Cook without Sugar

When you have selected the right apples, do not drown the apples in sugar. Rather, cook down a portion of the apples for the filling. This is very beneficial as we shall see. Pre-cooking helps the crust not to collapse and crack while it is baking. Also, the filling is not likely to shrink as much if some of the apples are already precooked. Besides, it concentrates the natural flavors and sugar, so you do not need to add as much sugar to your filling. To get this done, just cook about half the filling mixture in an oven over medium heat. Keep stirring until the apples become tender and start to break down. Thereafter, get the apple off the heat. Now, add the remaining uncooked apple and stir the mixture. Let it cool before adding it to your crust.

Avoid Burning the Crust

Do not burn the crust when preparing your apple pie. When some people are baking an apple pie, they usually burn edges of the crust. This is a problem you should avoid. To prevent this from happening, cover the edges of the pie with tin foil. Ensure you do not scrunch it down around the sides. If this happened, the pastry edges may be under baked. It is advisable to buy edge guard from local store that will be placed over the edges of the pie to protect them from burning

Follow these steps to make the best apple pie

  • Take the desired amount of flour and add butter. Rub them together with your hands until the pieces are smaller.
  • After the pieces have become smaller, but still visible, add water to the mixture. You may also add any other liquid ingredients of your choice into the flour mixture. Now, stir with a fork until evenly moist. Then, knead the dough in the bowl a few times. It is likely that the mixture will still be a little crumbly at this stage.
  • The next step is to turn the dough out onto a clean surface and knead again until it holds together. After this, divide the dough by half and shape it into 5-inch-wide disks. When you are done, wrap each of them in plastic and refrigerate them for at least an hour.
  • Now, the next important task is the one we described earlier about making the apple filling. Cook about half the filling mixture in an oven over medium heat. Keep stirring until the apples become tender and start to break down. Thereafter, get the apple off the heat. Now, add the remaining uncooked apple and stir the mixture. Let it cool before adding it to your crust.
  • Go and remove the dough from the refrigerator. Put it down on a table for about 5 minutes to warm a little. Proceed to roll one portion between sheets of wax paper into a 13-inch circle. It is best to peel off the top sheet and put the dough into a deep-dish pie pan. After peel off the remaining paper, bring the crust and scrape the filling into it. Repeat these steps with the remaining dough. Roll the dough between sheets of parchment paper into another 13-inch circle. Then, peel off the top of sheet and invert the dough onto the apple fruit.
  • Lastly, trim the crust so that it overhangs evenly. Then, tuck the top crust under the bottom crust. Then, seal the two together and make a plump edge. When you have completed all these steps and bake the apple, it is ready for consumption.

These are good steps to follow to make a perfect apple pie. You can enjoy your apple throughout the year, but summer present greater opportunity to enjoy varieties of apples because they become abundance during the summer.


Join Our Cookbook Club
Sign-up for our newsletter on new & free recipe books!
We respect your privacy.
No Fail Recipes